What’s a WordPress Theme? a Beginner’s Guide to Your ThemeForest Purchase
A step-by-step guide to getting your ThemeForest purchase up and running.

So you’ve downloaded a WordPress theme from ThemeForest. Fantastic! But now you’re wondering what to do with it…
Don’t panic! Anyone can set up a WordPress website or blog, even non-techies. In this step-by-step guide, we’ll walk you through what you need to know to create a website and get your new ThemeForest theme up and running.
Getting started: frequently asked questions
Before we get started, let’s run through some common questions around using ThemeForest themes and WordPress, specifically what is WordPress, and the differences between a theme/template and a website.
Back to basics: What is WordPress?
WordPress is software you can use to create a website. There are two versions of WordPress you need to be aware of:
- WordPress.com, also known as hosted WordPress, is a blogging and website service owned by a company called Automattic. WordPress.com uses the WordPress software. When you sign up for an account, you get free hosting. You can upgrade your account to get premium (i.e. paid) features like a domain name, no ads, and support.
- WordPress.org, also known as self-hosted WordPress, is where you can download the WordPress software so you can set up a website yourself. The software is essentially just a bunch of files, so you’ll need to buy web hosting and a domain name, and take care of things like security, themes and plugins yourself.
Currently, the WordPress software is used by more than 28% of all websites – almost one-in-three sites online. WordPress originally started out as blogging software and while it’s still used by bloggers all over the world, it has evolved into a powerful content management system that is used by big brands, including Wired, The New Yorker, Sony Music, and even Beyoncé. So it’s safe to say you’re making a good choice with WordPress.
What do I need to build a WordPress website?
Before we get started, there are a few things you need:
- Website hosting – there is where the files for your website will be stored
- A domain name – this is the name of your website, like myawesomesite.com
- A WordPress theme – there are thousands of themes available for purchase at themeforest.net
What is a WordPress theme?
A WordPress theme is a collection of files that work together to control how your WordPress website looks. This includes things like page layout, where your sidebars are located, and font and color choices.
Changing your theme changes the design of your website, including its layout, i.e. what a person sees when they visit your website.
A WordPress theme is not a website. This means that when you download a theme from ThemeForest, you simply have a file you can use to change how your website looks.
Can I use my ThemeForest theme on WordPress.com?
No, you can’t. WordPress themes that are purchased at ThemeForest can only be used for self-hosted WordPress websites. When you sign up for a WordPress.com account, you can only use the themes provided by WordPress.com.
Can I Use a WordPress theme with Squarespace / Wix / Weebly?
No, you can’t. WordPress themes can only be used on a self-hosted WordPress website. Website platforms such as Square, Wix and Weebly have their own proprietary methods for changing the design of a website.
Setting Up a WordPress Website
Now that you know what you need to create a website, let’s walk through how to setup a WordPress site and install your ThemeForest theme.
Step #1: Choosing a Web Host
A web host, or hosting provider, is a company that provides the technologies and services needed for a website to be view on the web. Website files are stored – or hosted – on special computers known as servers.
There are lots of hosting options available, but here are the ones that WordPress recommends:
Check out the links above and choose the web host and hosting plan that best suits you and your needs. Basic web hosting typically starts at around US$4.95 a month.
When you’ve worked out which web host you want to go with, go ahead and sign up. During the signup process, you should be given the option to buy a domain name for your website, so purchase that, too.
Once you’ve signed up and your account has been created, you’ll be taken to your web host’s dashboard where you can manage things like submitting a support ticket, updating your personal details, and setting up email. Depending on your web host, it’s here where you’ll also have the option to install WordPress.
Step #2: Installing WordPress
How you go about installing WordPress depends on your web host. Choose your host below for instructions on how to setup WordPress on your website:
- Setting up WordPress with Bluehost
- Setting up WordPress with Dreamhost
- Setting up WordPress with Flywheel
- Setting up WordPress with SiteGround
If your web host offers installation via Softaculous, do it! Softaculous offers an easy and automated way to install WordPress for you.
Step #3: Installing Your ThemeForest Theme
With your WordPress website now set up, you’re ready to install your ThemeForest theme.
When you first setup your WordPress website, a default theme will be activated using some demo content, so when you visit your website it should look something like this:

It looks okay, but it will look even better once your ThemeForest theme is installed!
Before you install your theme, you need to log in to your website. To do this, go to:
www.example.com/wp-admin
Where “example” is your website’s domain name. Enter your username and password to log in (your web host should have emailed these details to you).
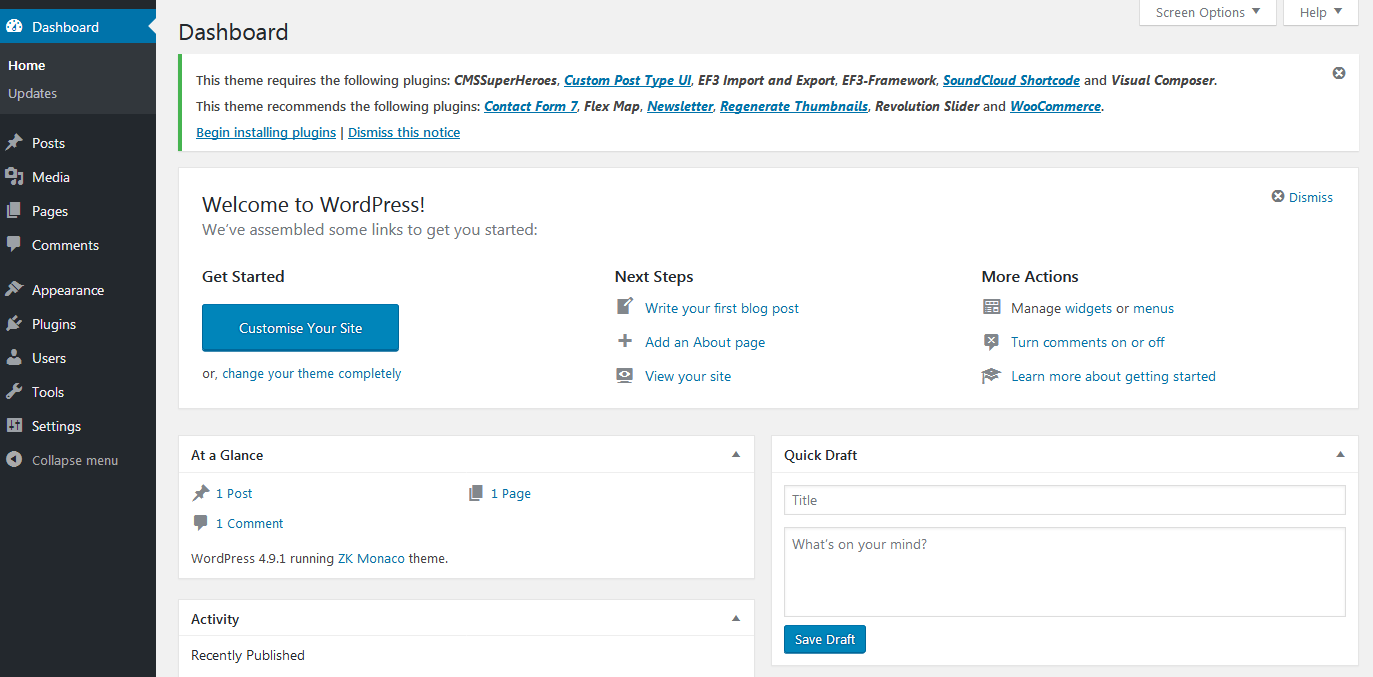
Once logged in, you will be taken to the WordPress dashboard, which looks like this:

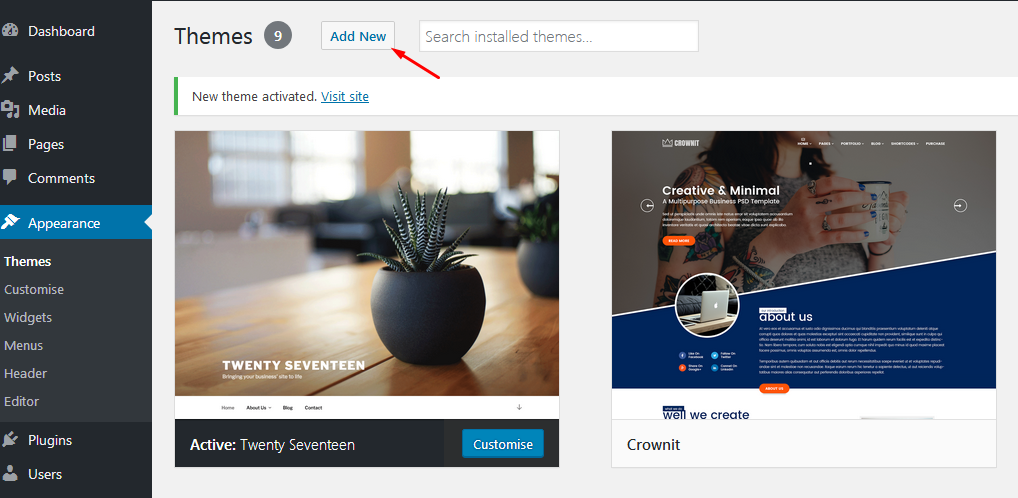
To install your ThemeForest theme, click “Appearance” in the sidebar and then click “Themes”.

On the screen that loads, click “Add New.”

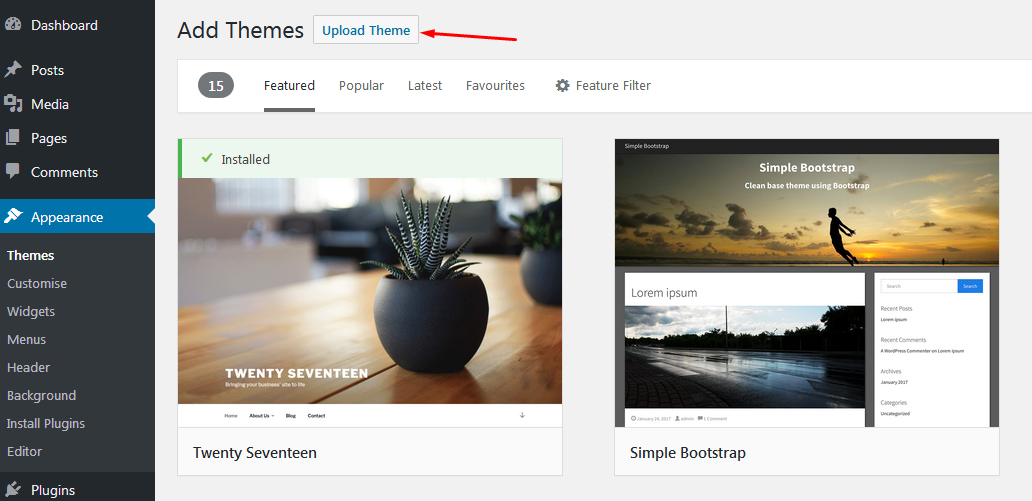
A new screen will load. Click “Upload Theme.”


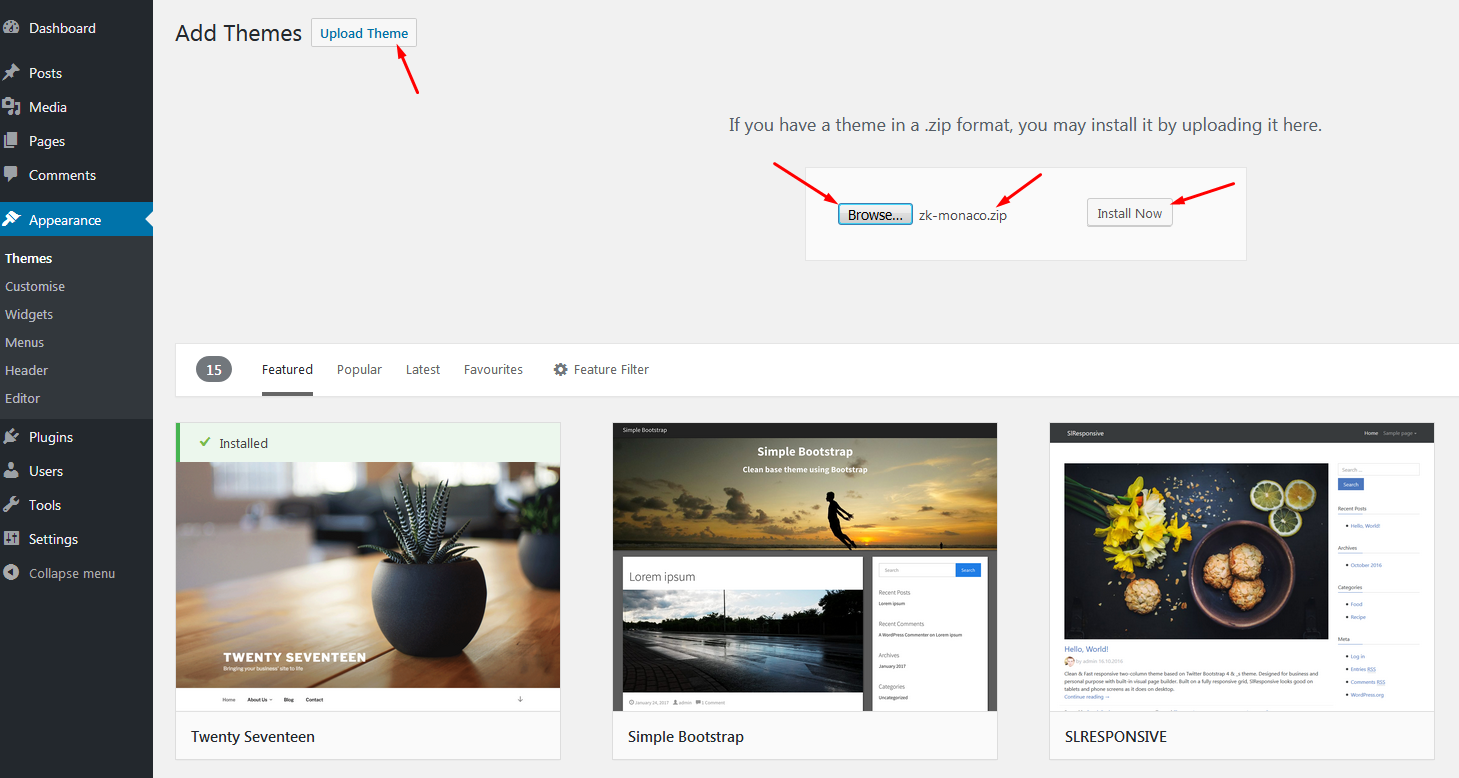
(Example: Monaco – Vintage Multi-Concept WordPress Theme)
When you download a WordPress theme from ThemeForest, it will come as a ZIP file. It’s important that you don’t unzip this file because WordPress only accepts ZIP files.
Click “Choose file” and navigate to where your theme is saved on your computer. Then click “Open.”
WordPress will install your theme. When the page reloads, you’ll be presented with three options: “Live Preview,” “Activate,” or “Return to Themes page.”

Click “Activate” to finish installing the theme.
The page will reload and you’ll either see a welcome page for your new theme or be taken back to the Themes screen where your newly activated theme will be displayed.

You’re now ready to start customizing your ThemeForest theme!
The theme you bought should include details on how to customize your theme. If you need further help, get in touch with the theme author.


