Would you like to get better rankings on Google? Improve organic traffic by 20%? Generate 13% more sales and increase conversions by 9%? Well, we’re about to show you how.
You may have heard about website caching and how it can boost your website speed but you never really paid any attention to it. Mostly because you believe you don’t have the tech knowledge required to setup caching on your own website, right?
Enabling website caching used to be a technical task only web developers were able to accomplish. But, not anymore. In this post, we’ll show you how to enable caching and drastically improve your website loading speed using a simple WordPress caching plugin.
What Is Caching?
Website caching is a technology that compresses your website pages to reduce its size and make your website load faster. Simply put, it creates lightweight static HTML versions of your PHP pages to allow your website visitors to load your web pages faster while also reducing your server resource usage.
There are several different types of caching technologies, including website caching, which you’re in control of. Then there’s server-side caching, which is mostly available with managed WordPress hosting platforms. And there’s also code minifications and compression technologies that help reduce page load times as well.
For a long time, many people avoided website caching because it required editing website files and editing core WordPress code. Now it’s as easy as installing a plugin and clicking a button. All thanks to WordPress plugins.
Why Is It Important?
The loading speed of your website directly affects the success of your business. If your website takes more than 3 seconds to load, you will lose most of your website traffic.
In fact, Google recently released a new search update that promotes websites based on loading speed by ranking the fastest websites higher on search results pages.
Needless to say, your website speed is a critical factor that will make or break your business website.
Installing a caching plugin is the first step you can take to speed up your website and make sure your site ranks well in search engines.
Best WordPress Caching Plugins
The good news is since you’re using WordPress, caching your website is easier than ever and most of the best caching plugins available today are free to download and use.
Here are some of the best caching plugins you can use to enable caching on your own WordPress website.
WP Super Cache
- Price: Free
- Best For: Beginners
WP Super Cache is a caching plugin developed by Automattic, the developers of WordPress software. This is arguably the most beginner-friendly free caching plugin available on WordPress. It allows you to enable caching with just one click and it also supports advanced features such as preloading, support for CDN, and more.
W3 Total Cache
- Price: Free
- Best For: Advanced users
W3 Total Cache is one of the most popular caching plugins available on WordPress with over 1 million active installs. It promises 10X faster website performance and comes with advanced features such as posts and code minification, caching in several deep levels, support for AMP and CDNs, and more. The only downside is that the installation of the plugin requires a little bit of technical knowledge.
Comet Cache

- Price: Free
- Best For: Beginners
Comet Cache is one of the new players in the market. Even though the plugin is fairly new, it’s quickly getting popular for its simple and easy installation process, which can be done with just one-click. The plugin supports client-side caching which allows double-caching in the client-side browser, RSS feed caching, ability to set automatic expirations for cached pages and more. The Pro version of the plugin includes much more advanced features and it costs $39.
WP Rocket

- Price: $39
- Best For: Beginners & advanced users
WP Rocket is the premium plugin that first introduced the one-click enable caching feature. Although, the plugin is capable of doing much more than just caching. In addition to easy one-click caching, support for CDN, cache preloading, browser caching, and minification, the plugin also supports lazyload, which allows you to load images on your blog posts only when a user scrolls down on the page to reduce page load times.
How To Install A Caching Plugin
To show you how easy it is to install and enable caching, we’ll guide you through the process step-by-step. For the demonstration, we’re going to use WP Super Cache since it’s the easiest plugin to install and it’s developed by the trusted team behind WordPress software.
Step 1: Search And Install WP Super Cache
Login to your WordPress admin dashboard and go to Plugins > Add New. In the search box, type WP Super Cache to find the caching plugin.
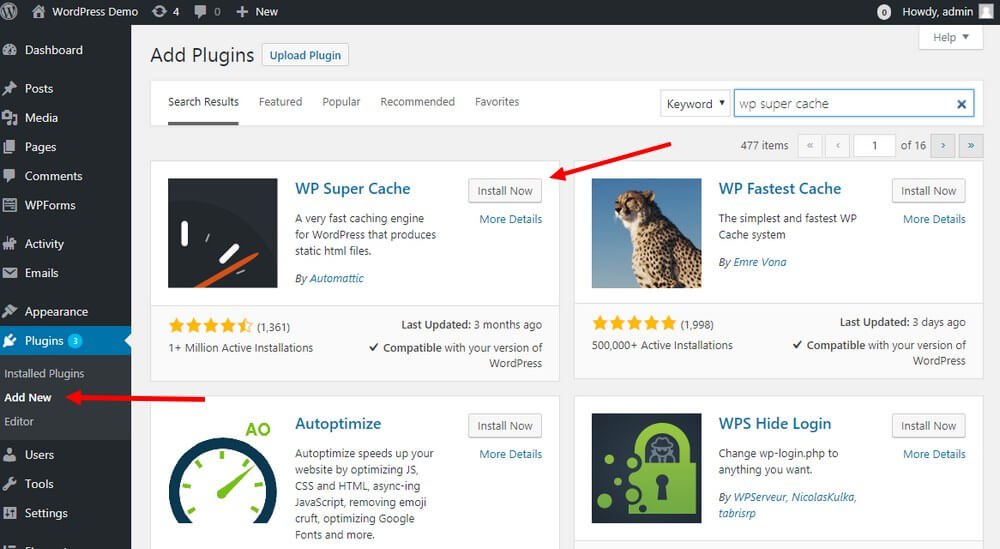
Then click Install to begin the installation. Once the installation is complete, click on the Activate button to activate WP Super Cache plugin.
Step 2: Enable Caching
After activating the plugin, you need to enable caching to let the plugin cache your website pages. To do this, navigate to the WP Super Cache plugin page via Settings > WP Super Cache.
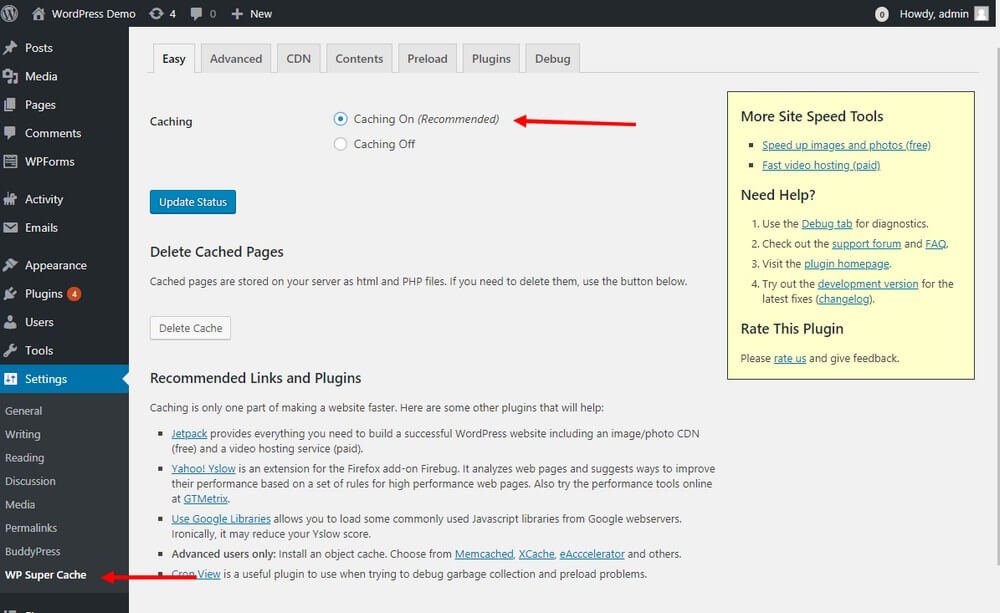
Here you’ll see the status of the caching plugin. Switch it to Caching On and click on Update Status to begin caching your website pages.
That’s it! Your website will now perform faster than ever.
Step 3: Customize Settings (Optional)
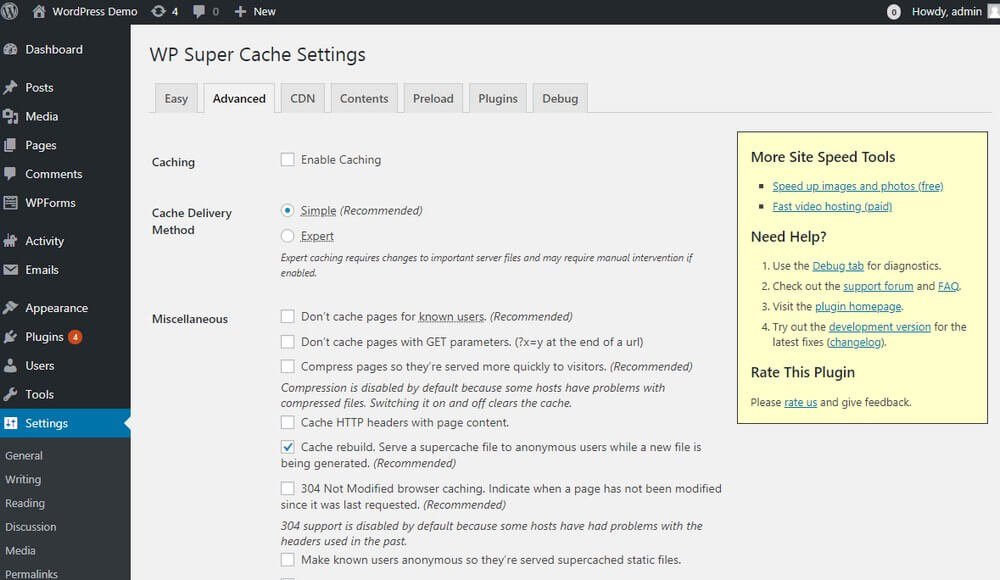
WP Super Cache doesn’t require any settings changes or customizations. But, if you’re an advanced user, you can use the advanced settings page to customize how the plugin cache your pages, choose a custom path to save cached files, enable dynamic caching, enable CDN, and more.
What’s Next?
There you go. Setting up website caching in WordPress is as easy as that.
Well, don’t stop your website optimization process here. There are many other ways you can speed up your website. You can enable a CDN, install an image compression plugin to reduce website image sizes, and use lazy loading to make your blog posts load faster.
Keep experimenting and find more ways to reduce your page loading times and get higher rankings on Google.


